Wednesday, February 25, 2015

2015 Ice Storms


The recent ice storms in TN have our area designated as a stage 2 disaster.  Pictures and videos of the damage are all over the internet.   Trees littering the roadways,  phone/electric poles snapped in half leaving tens of thousands without power, heat and water for days to come. My heart goes out to all those who have been affected by this storm.

My neighborhood has minimal damage in comparison to  areas around us... with many broken limbs and a few fallen trees and some inconvienient short-term power outages... I consider myself very lucky.  But even with damage that she has created, Mother Nature has put on a beautiful display.


Saturday, February 21, 2015

Sewing Machine Collection

Some of you have asked about my collection of sewing machines.  


This Singer Sylist 533 made in 1978 was my first machine.  At that time I worked for Singer Corp. in the legal office on the 63rd floor of 20 Rockfeller Plaza... you know the place where the ice skating rink is.  Before I left the company for a job closer to home I went downstairs to the retail store and bought this showroom floor-model with my employee discount... and since the detachable table was missing I received an additional discount making this a very reasonable purchase. (nope don't remember what that was right now).  I used it on and off for years, sewing clothing for me and then my kids,  and occasionally I would take it to the local repair shop for a cleaning and tune up.  Over the years the fiberglass (?) cams that determine the stitch design have dried up and cracked and no longer work.  So this machine is relegated to the straight stitch only status as I haven't been able to find replacement cams.
 When we moved here to Tennessee in 2002, I began taking quilting classes, and I  found a wonderful repairman, Ted, who used to work for Singer.  While picking-up my machine from him I told him the story of the great deal and discount I got because the table was missing.  He looked at me funny.  Took off the case.  Reached in.. fumble fumble fumble.... and pulled out the detachable table!  It had been stored in the case the entire time and I had no idea... and apparently neither did the orginal salesperson!  


I was very frustrated being without my machine when it needed servicing and I was in the middle of a quilt project, so I began searching yard sales for a back-up machine.  Lo and behold!  I found this Singer Stylest 534.  There was no learning curve adjusting to this machine... and it has the same cam problem that my original machine does.... and yes, the detachable table is stored inside the case on this one too!

These machines aren't super heavy, but I envied those who brought Featherweights to class and began trolling yard sales and antique shops for one.


    I found this Free-Westing House with a shuttle bobbin (or bullet bobbin) machine made in the 1950s.   I believe the finish is called a spackle...it's a gray unpolished look.  I had heard talk about the shuttle/bullet bobbin and never seen one so this came home with me for its "novelty".... and it is a very heavy solid metal machine.


This Universal was also made in the 1950's... one of many Singer knock-off brands.  Post-war, the Japanese cranked out machines like crazy and put any name or label on it that was requested.  It too is a very heavy machine.


This Aldens Deluxe ZigZag  was also made in the 50's.  Note the funky green color! and Chrome look dials and features... reminiscent of the 1950's cars.  I now had a machine that could zigzag, but there was no way to take it, table and all, to classes.


This Brother LS-2020 was donated to our church bazzar with a note saying it needed repair.  I took it to my trusty Singer repairman to see if he could do anything with it.  Of course he could!  It's only problem was the timing was off.  This machine is machine is made with lots of plastic and is, therefore, lightweight enough to carry to class.


  I found my first treadle at the Rte 127 Yardsale that runs through several states.  It was in a very plain boxy cabinet that I did not like... with this beautiful body ... 1921 Singer 66 Red Eye G8546619.  I found a second treadle in this beautiful cabinet with a very plain and worn Singer body.  I switched bodies and cabinets and now have this beauty.  (I sold the plain one a couple years ago).  It sat on display in my quilting room for several years.  Bonnie kept talking about and sewing on her treadles during quilt cam and that inspired me to have Ted take a look at it and see if it would work.  All it needed was a good cleaning and lube and a new belt!  I have been sewing on her ever since!


This 1946 Singer 15 AG724989 was given to me by Margena when she was downsizing her home and couldn't keep her entire collection.  There is a white plastic cased electric light that has been added in the back (not shown) that I hope to maybe replace with more original looking black cased light.

and finally.....


December 2013, on the way home from the Colts-Titans game, we stopped at an antique mall and I found myself a  1948 Singer 221-1 AH435380  featherweight.  She is wonderful for travelling and sews perfectly!

Monday, February 16, 2015

Sewing Studio Redo

 New Year's Day, when I went back into the Studio to get working on the mystery quilt, I discovered that the carpeting was soaked... from the back corner all the way into the middle of the room.  We discovered that the downspout extension had been removed and all that rain in December poured down off the roof  aimed right at the foundation corner.  I ran the dehumidifer for a few days hoping to dry it up and remove the musty smell, but it didn't work. I called Bob the handyman and got on his schedule for repairs.  In the meantime, my daughter and I emptied the room and pulled up the still soggy carpet.


We had painted the floor with Lock-tite the last time this happened back in 2007 (my daughter initialed and dated the floor with the paint!)  Apparently it wasn't enough to keep this from happening again.


Bob investigated and found that the floor molding was soft (rotting) and pulled off the wall boards to find that the water was seeping in from the brick foundation, not the flooring. 


All the rotting wood was removed, the brick foundation painted with Lock-tite and the rotten wood replaced.


The wall board was replaced, and while we were at it, extra electrical sockets and wiring for track lighting was added.


Primer and color.. I had agreed with my husband to paint it a neutral cream but  I woke up at 3am the night before purchasing the paint with an inspiration!   Lavendar!  A very light, neutral color rather than plain old white!   


And to save on labor and fussing with taping and sanding to get the walls smooth, Bob suggested a bead board and chair rail to cover up most of the damaged areas.
I LOVE it!


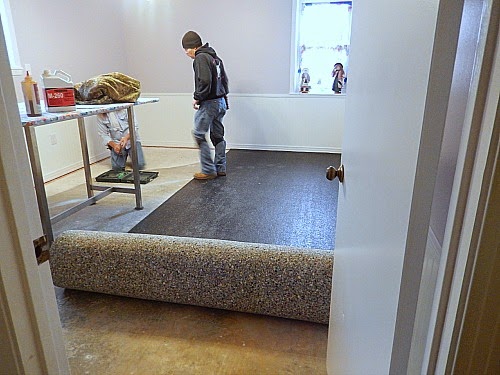
Next was the padding and carpet from Williams Carpet.  I can't get a good close-up picture but there are varying threads of color in this... including some purple .  If I decide to change things up in the future I will have a variety of colors to choose from without having to replace the rugs!


First thing back in the room is my collection of sewing machines!
  

Tubs with fat quarters, civil war and 1930s fabrics have been moved back in.  Along with smaller bins of projects started and a bookshelf full of additional projects.  
I think I need to expand my UFO listing!


Cutting dies and my Dear Jan project sit in boxes under my Studio Cutter.  The closet has 3 tubs of yarn and several other tubs with fabrics to be sorted through.   There are a few more boxes of fabrics and notions in the other room.  I need to get out shopping for more tubs to sort everything into.

I have three projects pulled out and sitting on my cutting/pressing table.... I can never work on just one thing at a time!

Saturday, February 7, 2015

Grand Illusions Update and Link-up

I am a bit behind on this project but am enjoying seeing all the different completed versions that have been posted.  I've been interrupted by the holidays and family obligations, a death in the family and some water damage to my sewing room ... no fabric was damaged, and I am in the process of building/designing a new studio... so all will be good when it's finally done.

I have really enjoyed working on this when I can... My word of the year  for 2014 ... and 2015 too....  is accomplish.... so this all fits in together as I will accomplish what I can what I can, when I can, not stress over it and have fun.     There was no way I could keep up with the clues as they came in, but I am having fun.  I have decided to slow down and am using my treadle to stitch this together and have found my piecing is more accurate this way. 

Clue 1 is done:

 Clue 2 is now done:

Clue 3 is done:

My studio is in the repair process so further progress will be on hold for another week or two.


I have been helping Miss Bettie with cutting and sewing her GIMG.  I cut some clue 4 blocks for her today so she has something to work on during the next week.  I'll try to get my clue 4 cut up and started this week too.


Monday, January 26, 2015

Hope Academy Placemat Project

I am prepping for a new project with my son's group Hope Academy.  Beginning February 4th, we are going help the kids make placemats for their mom's for Mother's Day.

My idea is to weave strips of fabric and quilt/sew them to a quilt sandwich.

I've collected a dozen or so flannel shirts and the teachers are in the process of helping me debone the shirts.  Once done, I will run them through my Studio cutter and make 2.5in strips

While they are doing that I am making weaving looms and quilt sandwiches.


I am cutting 18x22in cardboard frames.  Then marking and cutting 1/2in slats and 13x18 placemat center.

 
Then I'm making 15x18 quilt sandwiches using muslin, cotton batting and spray adhesive.

Next I center the quilt sandwich on the loom and trim to fit 1/2-1 inch past the placemat markings.


Using blue masking tape the sandwich is taped to the loom.


Finally, I use #10 cotton thread and load the loom.

One done... nine more to go.


Friday, January 23, 2015

Studio Redo


Back in 2007, when we had some heavy rains, we discovered that the downspout emptied off the roof right next to the foundation and water seeped into my daughter's basement bedroom.  We waterproof painted the corner of the room, replaced the carpet and added a downspout extension directing the water away from the foundation and have had no futher problems since.... until now.

A couple years ago my daughter moved out and the room happily became my sewing room. I hadn't been able to get into my sewing room for the month of December.  I was busy with work and family and holiday plans and travel.  But, on New Years Day I went down to spend the day sewing.  Unfortunately, that didn't happen.   One again, we discovered the rug was squishy wet; this time from the corner all the way into the middle of the room.  We discovered that someone had stolen the downspout extension and all that rain we had in December emptied off the roof next to the foundation and seeped into the room.

We replaced the downspout extension and I ran two dehumidifiers for several days, but the damage was already done.  

My handyman was busy on another job, so my youngest daughter came over to help.  We removed all the furniture and boxes of fabric stash, and cut up and remove the carpet and padding.  I'm glad we did because although the carpeting was beginning to feel dry to the touch... the padding underneath was still wet and some mold was forming.  Luckily, my stash was mostly in or piled on top of plastic containers, so no fabric was destroyed.


You can see the corner we painted with waterproofing the last time.

My handyman stopped by a couple days later and determined that the wood behind the wallboard was rotting.  He suggested cutting and removing about 2 ft of wallboard and checking the extent of damage hidden behind it.  He hopes he might be able to determine where the water is coming in and plug it so this doesn't happen again.  Then we will replace the wallboard and hide the damage with a beadboard chair-rail so we don't have to deal with taping and plastering and sanding and dust!  Then a fresh coat of paint before we have new padding and carpeting installed.  Hopefully, work will begin next week as soon as he finishes up his current job and I  can be back in my studio by Valentines Day!


Tuesday, January 20, 2015

UFO-WIP Listing - 2015 January

With the start of the new year comes an accounting and reporting of progress and accomplishments in 2014.  Also an attempt to get organized and plan for 2015.  So,here is my list....


Completed in 2014
2014 (6) Mitten ornaments (jan)
2014 (6) Star ornaments (nov)
2014 (6) Gingerbread Man ornaments (nov)
2014 (6) Tatted wreaths (dec)
2012 Orca Bay
2013 Daisy Placemats
2013 Red/Blue floral placemats
2013 Blue Toil Baby Quilt
2014 (2) blue doggie baby quilt
2014 (2) pink squares baby quilt
2014 Little Brother Quilt
2014 Middle Brother Quilt
2013 Blue floral placemats
2014 (3) Christmas Tablerunners
2014 (2) Cracker Barrel Tablerunners
2012 Christmas Swap Blocks


Waiting to be Quilted
Rosewood Cottage (since 2006) quilting by hand
Monkey Wrench BOM (since 2007) for sale


Class Projects Started
2006 Barn Blocks
2010 Swartz Creek Quilt
2012 Basic Class Wall Hanging…. Borders, quilting
2012 Winston Ways
2012 Turkey Tracks
2012 Midnight FIGHT
2013 Maddie Bea (becky’s barn)
2013 Spring Wall Hanging (WSS project)
2013 Becky’s Barn Basket wall hanging… borders, quilting

UFO – WIP
2009 1950s Santa
2009 Sunbonnet sue …prairie point borders
2010 Vicksburg BOM 
2011 Cheddar Bowties 2011 Happiness Key
2011 Novelty Quilt (pat sloan)
2011 Dear Jane/Hot Momma Rose
2012 Pillow Cover …assembly
2012 Red/White D4P… (needs quilting/binding)
2013 Celtic Solstice (nov) (clue 1)
2014 Cracker Barrel quilt (jan)… (needs binding)
2014 Grand Illusion (working on clues 2&3)
2014 Blue/Yellow Scrappy (needs quilting/binding)


Kits Not Yet Started
2012 maria’s stars
2012 Black white gray stars
Pastel stars
Pink baby quilt
5-star Table runner
Parisian 20
Cardinal wall hanging (blue)
Quilt Diva
Colonial Christmas
Golden stars table runner
CJ’s care bears
Iris table runner
2 American Dolls
Charm square CW strings
Jamestown landing BOM
Green/pink BOM
Orphan Fan Blocks
Heart Blocks
Pumpkin wall hanging
4th July wall hanging
Recycle quilt teddy bears


Sunday, January 4, 2015

Grand Illuisions update

 I have not made much progress on this mystery... what with a new grandbaby.. who ended up back in the hospital at 3 weeks old with RSV.. but doing better now.  

Then there were all the preparations for Christmas... gifts to purchase and wrap, meals to plan and cook, out of town family to take care of.  


Then the long drive to Maryland to visit the in-laws.  We arrived home with 35 seconds to spare before the ball dropped on the New Year.

So it wasn't until Friday Jan 2 that I was able to put any time into sewing.  Even though I wasn't through with clue 2 double diamonds, I decided to move on to Clue 3 floors and chair backs.

I quickly cut all the strips with my Studio Cutter and began sewing them together.  My easy sewing guide worked perfectly and the strips sets measured perfectly.  But....
   

After layering and cutting the strip sets to size, the trouble began. 


I played with my seam guide for 2 hours; sewing then frogging; sewing then frogging before locating the correct "scant" 1/4 seam that made these floor and chair back blocks measure correctly.

Once the seam guide was set the sewing began.   I still have a lot more to do, but here is what I have accomplished on this mystery so far:

Clue 1 Broken Dishes and extra HSTs

Clue 2 Double Diamonds and Clue 3 Floors & Chair backs
Now the mystery has been revealed and I am determined to keep making progress on this and not have another UFO to add to my list.